

Beekeepers worldwide reach for one tool before any other. A simple metal implement that revolutionizes hive management saves countless hours of frustration, and prevents many a crushed bee. I’m talking about the hive tool – the unsung hero of apiculture that 98% of professional beekeepers consider their most essential piece of equipment. “My hive tool is like an extension of my hand,” says Musembi Mutinda, a seasoned beekeeper who has tended hives in Kitui County, for over four decades. “I’d rather forget my veil than my hive tool.”
This multipurpose marvel might look unassuming, but it performs a remarkable range of functions that make it indispensable for anyone managing beehives.
What Exactly Is a Hive Tool?
A hive tool is a specialized instrument designed specifically for beekeeping operations. It’s typically a flat, metal implement. Most are around 10 inches long. They feature various edges, hooks, and sometimes specialized ends engineered for specific beekeeping tasks.
Think of it as the beekeeper’s Swiss Army knife. This single tool replaces what would otherwise require several implements. It’s designed to handle the unique challenges of working with structures built and maintained by thousands of tiny insects who use propolis – a resinous mixture bees collect from tree buds and sap – to seal every crack and crevice within their home.
What is a Hive Tool Used For?
The humble hive tool serves multiple essential functions:
1. Opening the Hive
Bees are meticulous architects. They seal their hive components together with propolis, creating an almost glue-like bond between wooden parts. A hive tool’s primary purpose is to break this seal. The flat end slides between hive bodies, applying leverage to separate components that would otherwise remain firmly attached.
This seemingly simple function becomes crucial when you understand that a typical hive inspection requires this separation. Without a proper tool, beekeepers might damage frames, crush bees, or compromise the structural integrity of the hive.
2. Frame Manipulation
Once inside the hive, frames must be removed for inspection. Frames hold the honeycomb where bees store honey, raise brood, and perform most hive activities. These frames become attached to the hive body and to each other with both propolis and burr comb (irregular comb built by bees between frames).
The hive tool’s narrow end slips between frames, creating enough space to grasp and lift them. Most hive tools feature a J-hook specifically designed to catch the frame top and lift it with minimal effort. This reduces hand fatigue during inspections involving multiple hives.
3. Scraping and Cleaning
Bees build comb wherever they find space – often in places inconvenient for the beekeeper. The flat, sharp edges of a hive tool make quick work of scraping excess comb, propolis, and wax from frames and hive bodies.
Regular cleaning maintains proper bee space within the hive – the specific dimension (approximately 3/8 inch) that bees need for movement. Too much space encourages unwanted comb construction; too little restricts bee movement and hive function.
4. Uncapping Honeycomb
When harvesting honey, cappings (the wax seal bees place over cells of ripe honey) must be removed. While specialized uncapping tools exist, a hive tool can perform this function effectively for small-scale operations or when processing just a few frames.
5. Minor Repairs and Adjustments
The sturdy construction makes hive tools useful for minor woodworking adjustments, tightening loose hardware, or performing emergency repairs during hive inspections.
How to Use a Hive Tool Effectively
Mastering the hive tool requires understanding its various applications and developing proper technique. Here’s a comprehensive breakdown:
Opening a Beehive: Step-by-Step Guide
- Position the tool correctly: Insert the flat end of your hive tool into the seam between the outer cover and the hive body. Apply gentle but firm pressure.
- Work systematically: Rather than forcing one spot, work your way around the hive, gently prying at intervals to break the propolis seal evenly.
- Listen for the “pop”: You’ll hear a distinctive sound when the propolis seal breaks. This indicates success without excess force.
- Lift with care: Once the seal is broken, use the hive tool’s leverage to lift the cover straight up to avoid rolling bees between moving parts.
- Repeat as needed: The same technique applies when separating supers (honey storage boxes) or other hive components.
I always make sure to position myself behind or to the side of the hive when opening it. This keeps me out of the main flight path and reduces bee agitation!
Removing Frames
Frames present a unique challenge during inspections. They’re often firmly propolized in place and may be connected to adjacent frames with burr comb. Here’s the proper technique:
- Create initial space: After removing the outer cover and inner cover, use your hive tool to separate the first frame from the hive wall. Insert the flat end between the frame and wall, then rock gently to create space.
- Employ the J-hook: Position the J-hook (if your tool has one) under the frame’s top bar, then lift upward. This provides excellent leverage with minimal effort.
- Maintain the gap: Once the first frame is removed, you’ll have working space. Keep this space as you move through the hive by repositioning frames slightly after examination.
- Avoid crushing bees: Always look before inserting your tool to prevent injuring bees. Move deliberately but gently.
One practical tip I’ve learned over years of beekeeping: remove the second frame first, not the edge frame. This creates working space with less chance of damaging the often more heavily propolized outer frame.
Scraping Frames and Removing Burr Comb
Excess comb and propolis require regular management:
- Hold firmly: Secure the frame or hive component firmly before scraping to maintain control.
- Use the flat edge: The sharpened flat edge of most hive tools makes clean work of removing unwanted wax and propolis.
- Scrape toward yourself: For better control, pull the tool toward your body rather than pushing away.
- Collect the scrapings: Many beekeepers keep a small container for burr comb and propolis scrapings, which can be melted down later for beeswax or other uses.
- Maintain bee space: Focus on removing only the excess comb that violates proper bee space, not the functional comb within frames.
Regular scraping prevents excessive build-up that can impede hive function and make future inspections more difficult. It’s a small maintenance task that pays significant dividends in hive health and management.
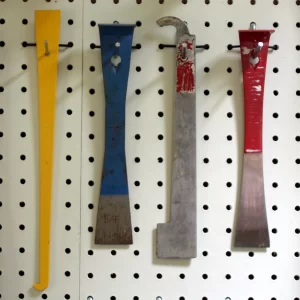
Types of Hive Tools: Finding Your Perfect Match
The beekeeping industry offers several variations on the classic hive tool design. Each has advantages for specific applications:
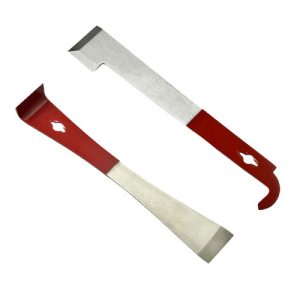
Standard Hive Tool
The most common design features a flat pry bar end, a curved J-hook for lifting frames, and flat surfaces for scraping. Typically 10 inches long, these tools balance versatility and manoeuvrability. They’re usually made from carbon steel or stainless steel.
Ideal for: Beginners and general beekeeping operations.
J-Type Hive Tool
Ideal for: Beekeepers who manage many hives and need to reduce hand fatigue.
Frame Grip Hive Tool
A newer innovation combines traditional hive tool functions with integrated frame grips. These allow one-handed frame manipulation, reducing the need to set down your tool during inspections.
Ideal for: Commercial operators and those with mobility or strength limitations in their hands.
Mini Hive Tool
Smaller than standard models, mini hive tools offer precision for detailed work. Some beekeepers carry both a standard and mini tool for different applications during the same inspection.
Ideal for: Detail work, queen finding, and operations in observation hives.
Multi-Function Hive Tools
These incorporate additional features like bottle openers, screwdrivers, or specialized scraping edges. While convenient, they sometimes sacrifice the simplicity that makes traditional designs so effective.
Ideal for: Hobbyists who appreciate gadgets and multifunctionality.
How to Choose the Right Hive Tool
Selecting your ideal hive tool involves considering several factors:
Material Matters
Stainless Steel: Resists rust, handles sanitization well, and maintains a clean appearance. However, it may be slightly less sturdy than carbon steel for heavy prying.
Carbon Steel: Offers exceptional strength and durability but requires more maintenance to prevent rust. Many experienced beekeepers prefer the additional strength.
Coated Tools: Some feature non-stick or coloured coatings that improve visibility and reduce propolis adherence. These coatings can wear over time.
Handle Design
Ergonomic Grips: Reduce hand fatigue during extended use. Particularly valuable for commercial beekeepers who perform multiple inspections daily.
Bare Metal: Traditional designs without special grips clean more easily and harbour fewer bacteria but may be less comfortable during extended use.
Size Considerations
Standard Length: The 10-inch tool balances reach and maneuverability.
Extended Length: Offers better leverage for stubborn components but may be unwieldy in tight spaces.
Mini Tools: Provide precision but sacrifice some leverage.
Cost vs. Quality
Investment in a quality hive tool pays dividends. Professional-grade tools typically cost between $15-$30 but will last for years or even decades with proper care. Bargain options under $10 often use inferior metals that bend, rust quickly, or fail to maintain a sharp scraping edge.
My personal recommendation? Start with a high-quality standard stainless steel hive tool. As you gain experience, you’ll develop preferences that might lead you to specialized tools for specific applications.
Expert Techniques: Beyond the Basics
Experienced beekeepers develop specialized techniques that maximize the utility of their hive tools:
The Two-Tool Technique
Some beekeepers carry two different hive tools during inspections. The primary tool handles heavy prying and frame removal, while a secondary tool (often a mini version) manages precise operations like queen cage installation or wedding frame manipulation.
The Frame Rest Strategy
During thorough inspections, rather than holding frames or leaning them against the hive (risking queen damage), some beekeepers use their hive tool as a temporary frame rest. By positioning it across the hive body corners, it creates a secure place to rest a frame temporarily.
The Propolis Harvest
Rather than discarding propolis scrapings, knowledgeable beekeepers collect this valuable substance. Pure propolis has significant antimicrobial properties and commands premium prices in natural health markets. A specialized container attached to your belt can make collection efficient.
The Silent Entry
For operations requiring minimal bee disturbance (like quick checks or adding feeders), veterans use their hive tool to create a tiny gap at one corner of the outer cover. This allows a quick peek or minimal intervention without fully opening the hive and disrupting the colony’s temperature regulation.
Proper Maintenance and Cleaning
A well-maintained hive tool performs better and lasts longer:
Regular Cleaning
- After Each Use: Scrape off excess propolis and wax while still soft from the heat of your hands.
- Deep Cleaning: Periodically soak in a solution of hot water and a small amount of lye to dissolve accumulated propolis. Commercial orange oil cleaners also work effectively.
- Sanitization: When working with multiple apiaries or after handling potentially diseased hives, sanitize your tool with a 70% alcohol solution or a bleach solution (one part bleach to nine parts water).
Preventing Rust
For carbon steel tools:
- Dry thoroughly after cleaning.
- Apply a thin coat of food-grade mineral oil.
- Store in a dry environment.
Sharpening
Maintain the scraping edge by occasionally honing with a metal file. The goal isn’t a knife-edge but rather a clean, straight edge that removes propolis and wax efficiently.
Storage Solutions
Dedicated storage prevents misplacement and protects the tool from damage:
- Tool belts with specialized pockets
- Magnetic holders attached to hive stands
- Custom sheaths that attach to beekeeping suits
I’ve found that keeping a designated “beekeeping toolbox” with my hive tool, queen marking supplies, and other essentials ensures I’m always prepared for inspections!
Safety Considerations
The hive tool’s utility comes with responsibilities:
Personal Safety
- Secure grip: Propolis makes tools slippery – maintain awareness of your grip.
- Controlled force: Apply steady pressure rather than sudden jerks when breaking propolis seals.
- Mindful placement: Never set your hive tool on top of frames where it could fall and damage the colony.
Bee Safety
- Slow movements: Quick jabs or uncontrolled scraping increases bee agitation and mortality.
- Visual confirmation: Look before inserting your tool to avoid crushing bees.
- Temperature awareness: In cold weather, minimize hive opening time to prevent chilling the brood.
Disease Prevention
- Sanitize between apiaries: This critical step prevents spreading pathogens between bee yards.
- Inspect your tool: Before use, ensure no dead bees or suspicious materials remain from previous inspections.
The Evolution of the Hive Tool
The modern hive tool evolved alongside movable-frame hive designs. When Lorenzo Langstroth revolutionized beekeeping with his movable frame hive in 1852, the need for specialized tools quickly became apparent.
Early beekeepers adapted existing tools – particularly putty knives and small pry bars. By the early 1900s, beekeeping supply companies began manufacturing dedicated hive tools with features specifically designed for apiculture.<>p>
Today, while the basic design remains similar to tools from a century ago, innovations in metallurgy, ergonomics, and specialized functions continue to refine this essential implement.
Beyond the Standard: Specialty Applications
The hive tool’s versatility extends to specialized beekeeping operations:
Queen Rearing
For queen breeders, precision versions of hive tools facilitate the delicate work of transferring larvae during grafting operations. These tools often feature finer points and more precise edges.
Comb Honey Production
Producers of cut comb honey use hive tools with exceptionally clean, sharp edges to make precise cuts when harvesting sections without damaging surrounding comb.
Top Bar Hive Management
Beekeepers using top bar hives often prefer longer, thinner tools that can reach deeper into these alternative hive designs to separate comb from the hive walls.
Common Questions About Hive Tools
Can I use other tools instead of a proper hive tool?
While improvised tools like paint scrapers, putty knives, or screwdrivers can perform some hive tool functions, they lack the specialized design features that make genuine hive tools efficient. The investment in a proper tool pays dividends in time saved and reduced bee mortality.
How many hive tools should I own?
Most beekeepers find that having at least two tools is practical – one primary tool and a backup. Commercial operators often have multiple tools stationed at different apiaries or carry several during inspections for different functions.
Can hive tools transmit diseases between hives?
Yes. Spores from diseases like American Foulbrood can survive on tools and infect otherwise healthy colonies. This makes proper sanitization between apiaries essential.
Why do some beekeepers have coloured hive tools?
Bright colours increase visibility when the tool is set down in grass or among hive components. Some beekeepers also colour-code their tools by apiary location or designated use.
The Humble Hero of the Apiary
The hive tool represents the perfect marriage of form and function in beekeeping equipment. Its deceptive simplicity masks the sophisticated design considerations that make it essential for modern hive management.
From the beginner with a single backyard hive to the commercial operator managing thousands of colonies, this unpretentious implement remains the constant companion of beekeepers worldwide. Its effectiveness comes not just from its design but from the skilled hands that wield it with care and respect for the remarkable creatures whose homes it helps us access.
I’ve found that mastering my hive tool’s use transformed my beekeeping experience. What once felt like awkward intrusions into the colony became smooth, deliberate inspections with minimal disruption. The right tool, properly used, benefits both beekeeper and bees alike.
Whether you’re just starting your beekeeping journey or refining techniques developed over decades, your relationship with your hive tool deserves thoughtful attention. This simple piece of metal represents the interface between the beekeeper’s intentions and the colony’s reality – a bridge between our world and theirs.


0 Comments